Creating regular WordPress backups is part of the basis of a clean Website maintenance. Because if errors ever occur on the website or your data is completely deleted, you can easily restore your WordPress website with a backup.
As WordPress hosting provider we create daily backups for all our customer websites and have already saved many websites with them. Since our WPspace Team Since we love WordPress, we have also extensively tested other methods that we recommend to our clients and would like to introduce to you today.
After reading the article, you will know how to create and restore automated and manual backups of your website. We also provide you with important tips on what you should consider when making backups!
Why should I create website backups regularly?
You will be glad to have a backup of your website if it is completely or even partially broken for some reason. Unfortunately, it happens again and again that websites get broken. This can have various reasons:
- Updates of plugins, theme, or WordPress core are incompatible with each other.
- Reinstallation of an incompatible plugin or theme.
- For WordPress Security, to prevent hacked websites due to a security vulnerability.
All these reasons can cause features to be restricted or your website to be broken. Depending on the situation, you can use troubleshooting to locate and fix the cause. If you cannot find the cause, you can restore a backup and thus revert your website to the state it was in before the problem occurred.
Create a WordPress backup: 5 ways
There are several ways to create a backup of your website. Below, I will explain each method in detail, including their pros and cons.
In general, I always recommend creating backups of your website using at least two different methods. If one of the two backups turns out to be faulty, you have a second option you can fall back on.
💡 Note: If you receive an error message when uploading your backup file, you probably need to Increase WordPress upload limit.
WordPress Backup in your WordPress Hosting (Beginner Level)
As part of our daily tasks as a premium managed WordPress host, we automatically create backups of all our customers' websites, regardless of size and selected plan. Full backups of the customer websites are created automatically once a day and made available to the customer in the hosting interface for management.
💡 Note: Automatic updates by the hoster are not a given! Make sure whether you have a Shared or Managed WordPress Hosting provider uses. With managed WordPress hosting, daily backups are usually included.
In addition to the automatic backups created by the WordPress hoster, you can configure your own backups with the following settings:
- Full or incremental
- Cycle: Daily, Weekly, Monthly, etc.
Create a WordPress backup at WPspace
You have your website in a WordPress Hosting Plan with WPspace? I will show you in the step-by-step guide below how you can create your own backup there
1. Log in via this Login link log in to your WPspace customer account.
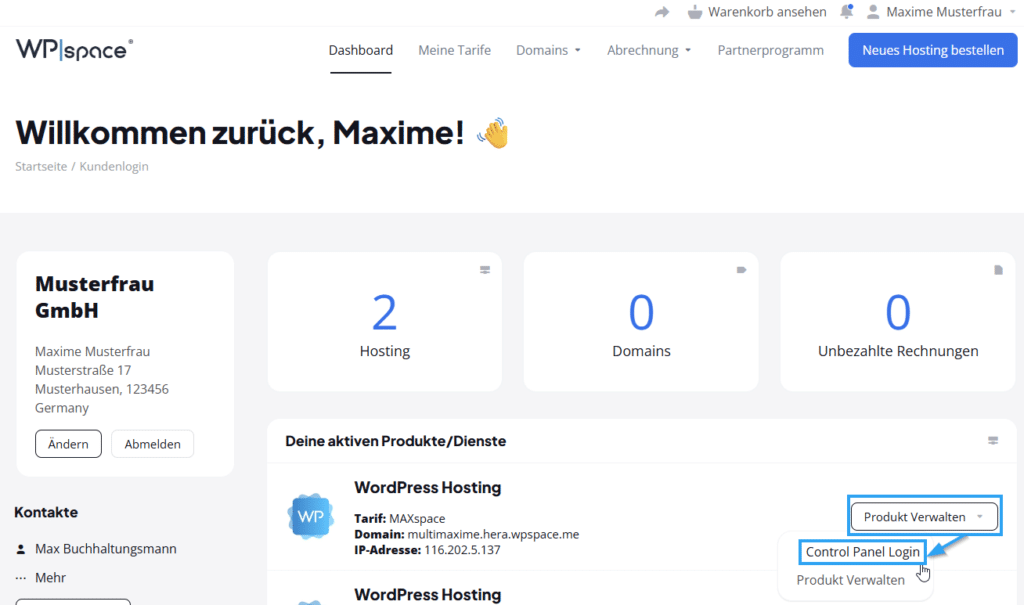
2. Under „Your active products / services“, click on „Manage Product“ and „Control Panel Login“ in the row of your hosting plan.“
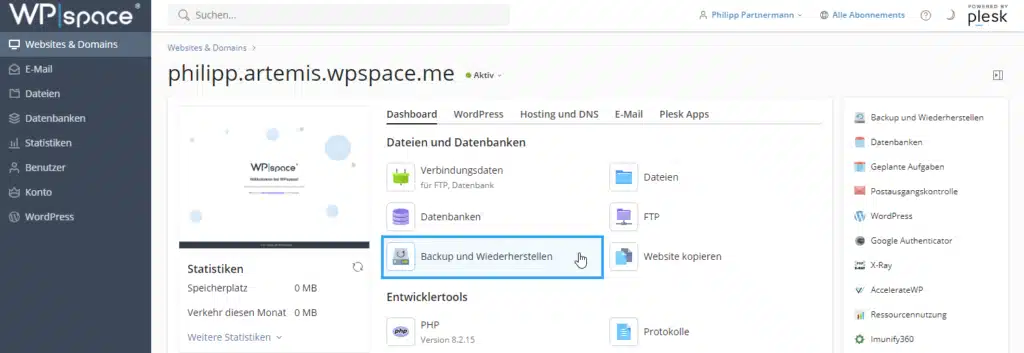
3. Now you are in your hosting interface. Click on „Backup and Restore“.
4. Click „Create backup“ now“

5. Now you can configure the settings for your backup. If you want to create a full backup of your website, I recommend selecting „Full“ instead of „Incremental“ under „Type“. The remaining settings can be left as default.
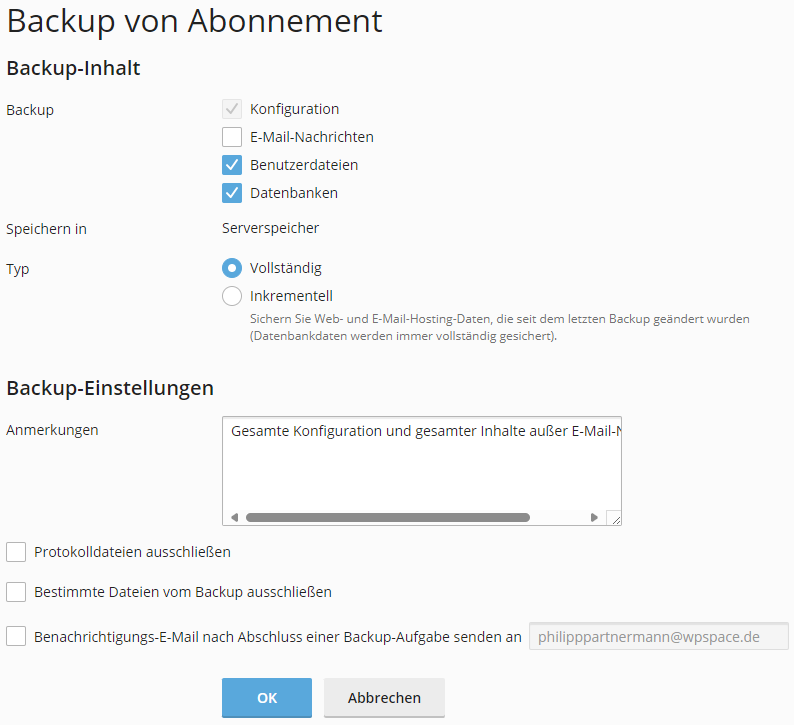
6. Confirm the creation of your backup and wait until the backup is complete. Afterward, it will appear in your overview.

💡 My tip: Download the backup using the green arrow on the right. Afterwards, save the backup either locally on your PC and/or in your cloud. This way, you have backed up the backup twice.
Restore WordPress backup at WPspace
You can restore a backup you created yourself in the hosting control panel or a backup created by WPspace with just a few clicks. I'll show you how!
1. Navigate to the overview of the Backup Manager in your hosting interface (if you don't know how, follow steps 1 to 3 of „Creating a WordPress backup at WPspace“).
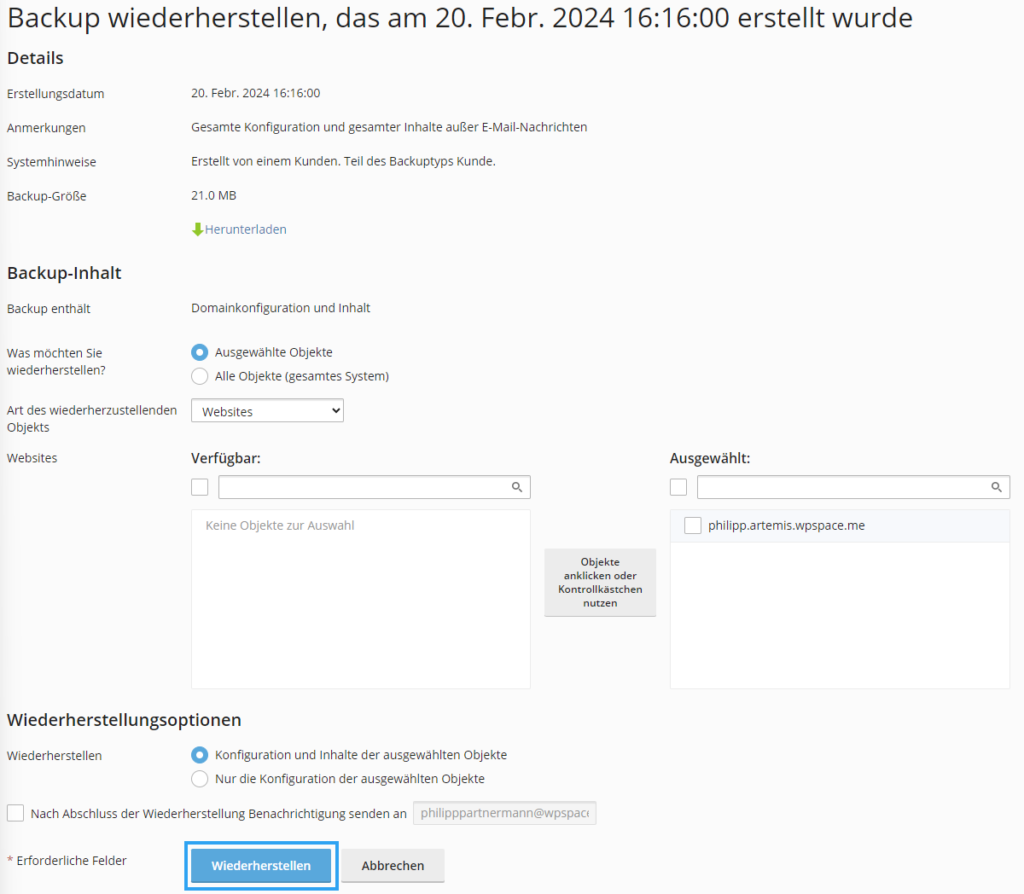
2. In the overview, click on the date of the backup you want to restore.
3. Under „Type of object to restore“, select „Websites“ from the drop-down menu.
4. Now check the box next to your domain and click the blue „Select 1 object“ button. After clicking the button, your domain should be in the right column.

5. Click Restore.
6. In the Backup Manager overview, you will now see a bar at the top that shows you the progress. As soon as the message „The restoration of the backup Feb 20, 2024 4:16:00 PM is complete.“ appears here, your backup has been successfully imported.
Pros and cons of backups with your hoster
👍 Advantages of WordPress backups via hoster:
- Automated:
WPspace automatically creates a daily backup for its customers. The backup is available to the customer around the clock in the hosting interface without any additional effort or cost. - Simple, straightforward and fast:
With just a few clicks, you can independently and without any prior technical knowledge create a backup of your website. If you have any questions, detailed Guides in the Help Center and the support is available. - No plugin required:
Every additional plugin on your website brings new security risks and slower loading times. No additional plugin is required for the route via the hoster.
👎 Disadvantages of WordPress backups via hoster:
- Can become expensive:
At most hosting providers, including WPspace, backups created by the customer themselves use up the storage space included in the booked hosting plan. Since backups can take up several GB depending on the size of the website, they can quickly consume the „expensive“ storage space of your website.
Using a WordPress Backup Plugin (Beginner Level)
A particularly easy way to create WordPress backups is by using a WordPress backup plugin. There are many different free (and also paid) plugins that create backups of your website for you.
My favorite backup plugin is UpdraftPlus. According to the plugin repository, the plugin now has over 3 million active installations (as of March 2024) and an average 5-star rating from over 7,600 reviews.
Even in its free version, UpdraftPlus offers a wide range of features that allow you to back up your site easily and regularly. With this feature set, UpdraftPlus clearly stands out from other WordPress backup plugins that offer much more limited functionality.
Create backup with „UpdraftPlus“ plugin
Step by step, I will explain to you how you can easily create backups of your WordPress website using the UpdraftPlus plugin. After that, you will be able to create and restore backups independently in the future.
1. WordPress Login:
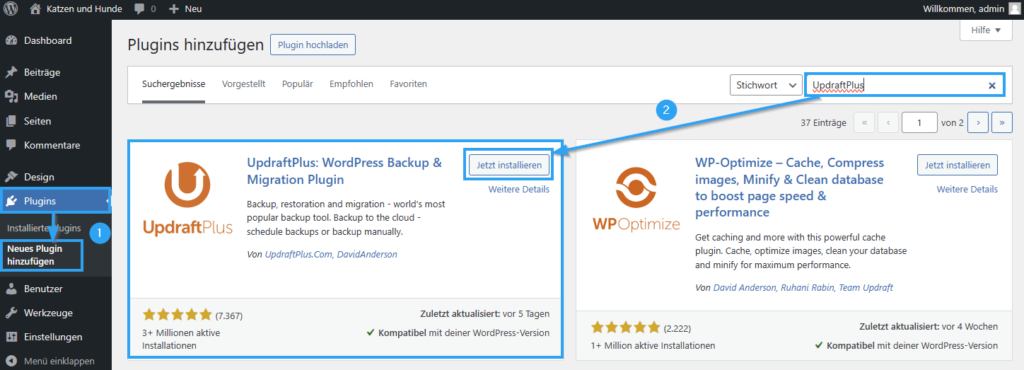
Log in to your WordPress Dashboard. Then navigate to „Plugins“ > „Add New Plugin“.
2. WordPress Backup Plugin Installation:
Here you type „UpdraftPlus“ into the search in the top right. Click on „Install Now“ and „Activate“ in the plugin's box.
3. UpdraftPlus Dashboard:
Navigate via „Settings“ > „UpdraftPlus Backups“ to the UpdraftPlus dashboard. Here you can create and download your backups.
4. Create backup:
To create a backup, click the „Back up now“ button. In the pop-up that has now opened, select the items you want to back up.
💡 My tip: Select database and your files for the backup.
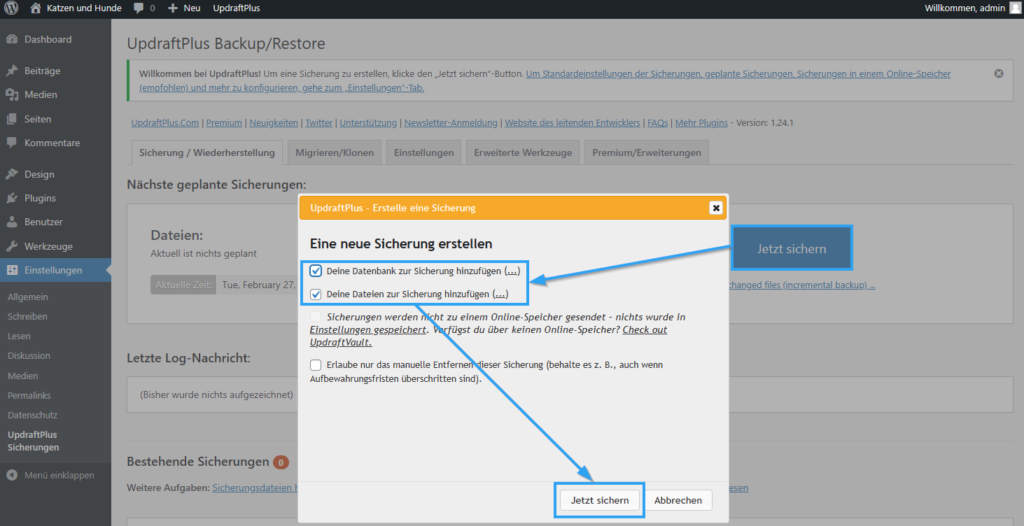
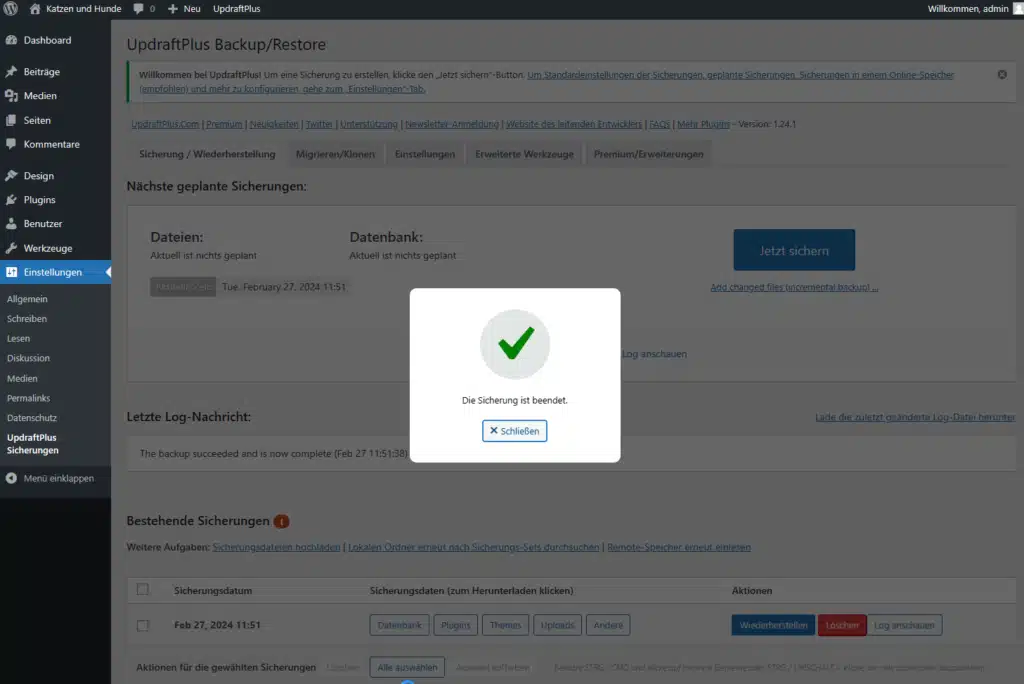
The creation time depends on the size of your website and database. You can track the current progress in the progress bar. As soon as the backup has been successfully created, a notification will appear and the backup can be found under „Existing backups“.
4. Download and back up the backup:
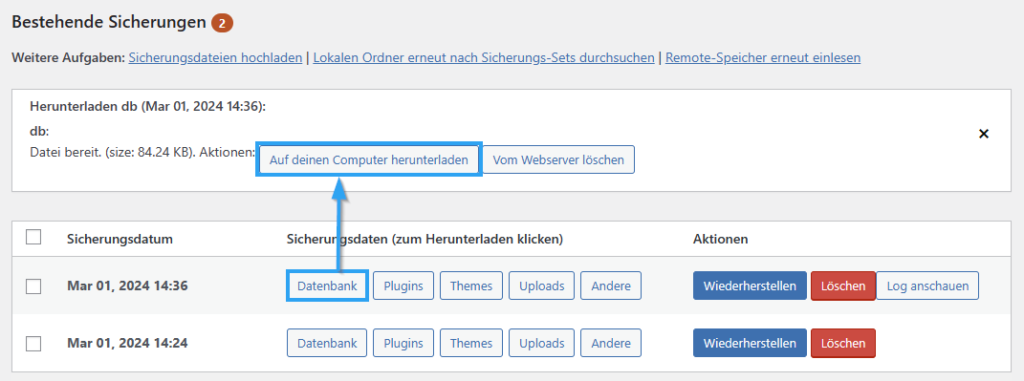
Your newly created backup file has now been saved on the server where your website is hosted, in your website's file directory. To be more precise, under httpdocs > wp-content > updraft.
You can now easily download the created backup files via the UpdraftPlus Dashboard. To do this, simply click on the various backup data types (database, plugins, themes, uploads, others) and then on the „Download to your computer“ button.
Pros and cons of backups created with a WordPress plugin
👍Advantages of WordPress backups via plugin:
- Automated regular backups:
The backup plugin can automatically create a backup of your website for you at regular intervals, for example weekly or monthly. - Fast installation and configuration:
You do not need any training to use the backup plugin „UpdraftPlus,“ as installation, configuration, and use are simple and intuitive. - Free version completely sufficient:
In the free basic version of the „UpdraftPlus“ plugin, sufficient functions are available to normal WordPress users. The paid version is therefore generally not necessary.
👎 Disadvantages of WordPress backups via plugin:
- High disk space consumption:
The backups are stored in your website's file manager. As a result, they consume the storage space of your hosting plan. - Additional plugin:
Every additional plugin on your website brings security risks and performance hits. Therefore, you should install as few plugins as possible.
Create a manual WordPress backup (Advanced level)
A manual backup means backing up your website's files and database manually. To do this, you access the server where your website is hosted and save all relevant data. For this procedure, you need an FTP user, an FTP client tool, and the free program phpMyAdmin.
To access your website's files, you need an FTP user and an FTP client tool. With this combination, you establish a connection to your website's data directory and can access it.
You can normally create your FTP user directly with your host in your hosting control panel. If you are a WPspace customer, you will find a detailed guide in our help center on how to Create and use FTP access can.
As an FTP program, I recommend the free FTP client tool „FileZilla„FileZilla is an industry standard. We also work with FileZilla and are very satisfied! If you want to check out alternatives to FileZilla, I recommend the following tools:
- SolarWinds Serv-U File Transfer Protocol (FTP) Server
- Cyberduck – Free FTP client tool (Mac)
- WinSCP – Free FTP Client Tool (Windows)
For the manual backup of your database, I recommend the free tool phpMyAdmin. If you are a WPspace customer, you do not need to install the recommended tool, as it is already installed server-side for all WPspace customers and is available free of charge.
1. Access files via FTP client:
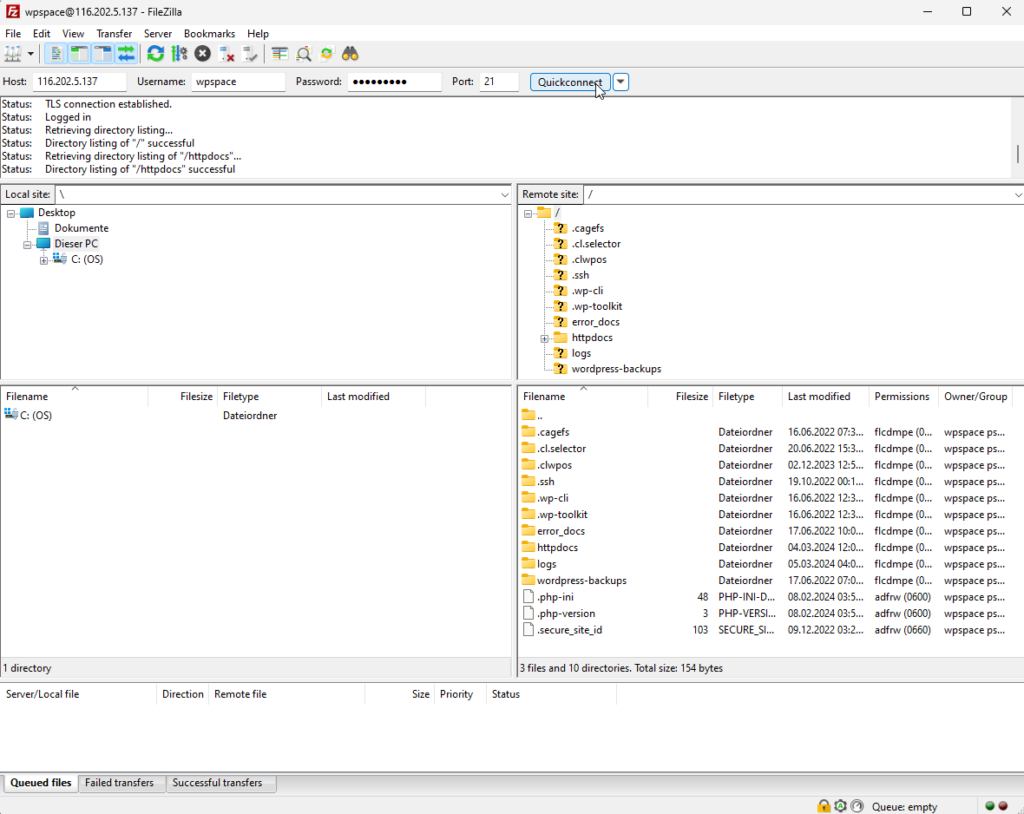
Open your FTP client tool, which is probably FileZilla. Enter your FTP user details (server, username, password, and port) in the top bar there.
2. Backing up website data:
After the connection has been successfully established, you will see your PC's data on the left and your website's data on the right.
I recommend backing up your entire httpdocs folder. Here you will find all relevant folders such as wp-content with uploads, plugins, and theme.
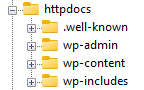
You can now simply drag and drop the folder you want to back up into the destination folder on your PC (left side). The data will then be downloaded automatically and saved locally in the selected storage location.
The duration of the process depends on the size of your website and your internet connection. Therefore, it is best to perform the download with a stable and fast internet connection.
3. Access database via phpMyAdmin:
💡 Info in advance for WPspace customers: In your hosting interface, you can access phpMyAdmin directly under Database. Therefore, you do not need to install the program separately or enter any user data. Start with step 4 in the next step.
Now open phpMyAdmin to access your database. We also need to back this up manually.
When you open phpMyAdmin as a program on your PC, you log in with your username and password. You can find this data in your wp-config.php or under databases in your hosting control panel.
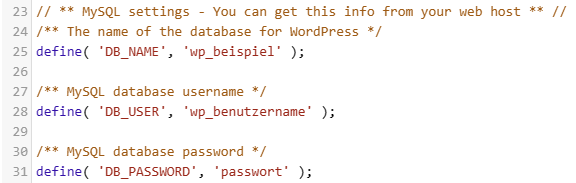
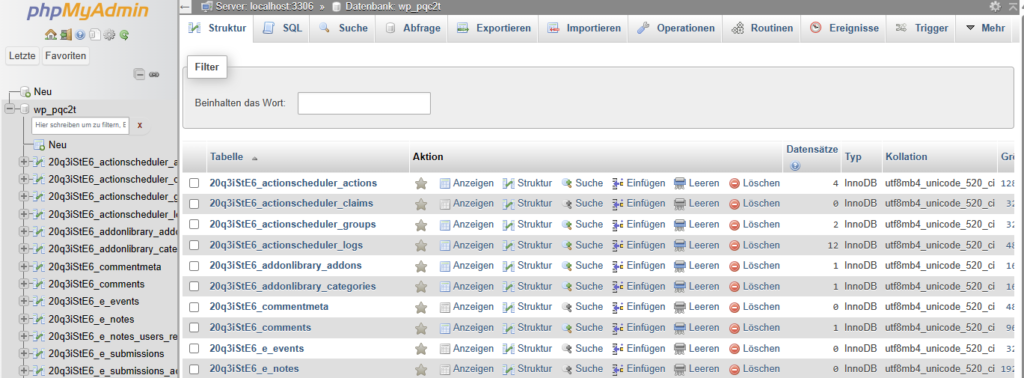
Once you successfully access phpMyAdmin, you will see an overview that looks similar to this:
4. Back up database:
To finalize your manual backup, all you need is a backup of your database. You are now downloading it.
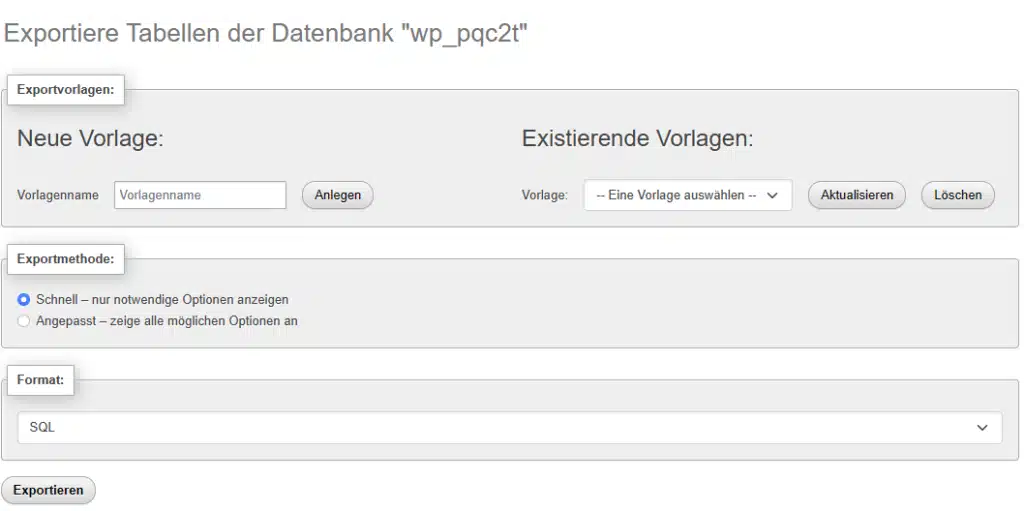
To do this, first select your database in the left column and then click on „Export“ in the top menu bar.

Leave the export method as „Quick“ and the format as „SQL“. Then click on export. You are now downloading your website's database as an SQL file.
5. Save manual backup:
Make sure to back up your website data (from steps 1 and 2) together with your database (steps 3 and 4) in a secure location.
The combination is a complete manual backup. Should you wish to restore a backup, you will need the data and the database.
👍Advantages of manual WordPress backups:
- No plugin required:
To create this, you do not need to install any additional plugin that could pose security risks. - Custom data backup:
You can completely decide where and which data of your website is backed up.
👎 Disadvantages of manual WordPress backups:
- High manual effort:
Compared to the other presented options for creating a WordPress backup, you have to plan significantly more time for the manual method. - Basic technical understanding required:
To create a manual backup of your website, a basic understanding of hosting, servers, and FTP is advantageous. - No automation:
As the name suggests, this is a manual backup. This means the backup is created manually rather than automatically. Therefore, you cannot schedule weekly backups, but instead always have to spend your own time doing it.
Book a backup service provider (beginner level)
If you do not want to take full responsibility for your website's backups yourself, you can also hire service providers. These service providers create backups for you and subsequently make them available to you encrypted in a cloud. Well-known service providers include:
The prices for the listed providers range between 99 USD and 149 USD. The cheapest provider (disregarding discounts) is „SolidBackups“.
The frequency of your backups and how long backups are kept for you depends on your chosen plan. In some cases, providers keep the backups for you „forever.“.
👍Benefits of Backups Through a Service Provider
- Encrypted backup in a cloud:
Your backup is stored encrypted in the cloud. This way, your backup is protected against attacks while allowing you to access your backup in the cloud from anywhere. - No technical know-how required:
The service provider takes care of the entire creation, encryption, and backup security for you. Therefore, you do not need any technical know-how.
👎 Disadvantages of backups via service providers
- Expensive:
There are many free ways to create backups; by comparison, these backup services are very expensive.
WordPress exporter for single posts
The WordPress Exporter is a tool that comes standard with every WordPress installation. You can find it under „Tools“ > „Export.“.
With the WordPress exporter, you do not create a complete WordPress backup of your website, but you can save comments, categories, and tags in addition to posts and pages.
1. Export posts:
First, log in to your WordPress dashboard and navigate to Tools > Export. Select the content type you want to back up, for example, posts or pages. Here you can filter even more precisely by categories, authors, publication date, and status. Afterward, click on the Download Export File button.
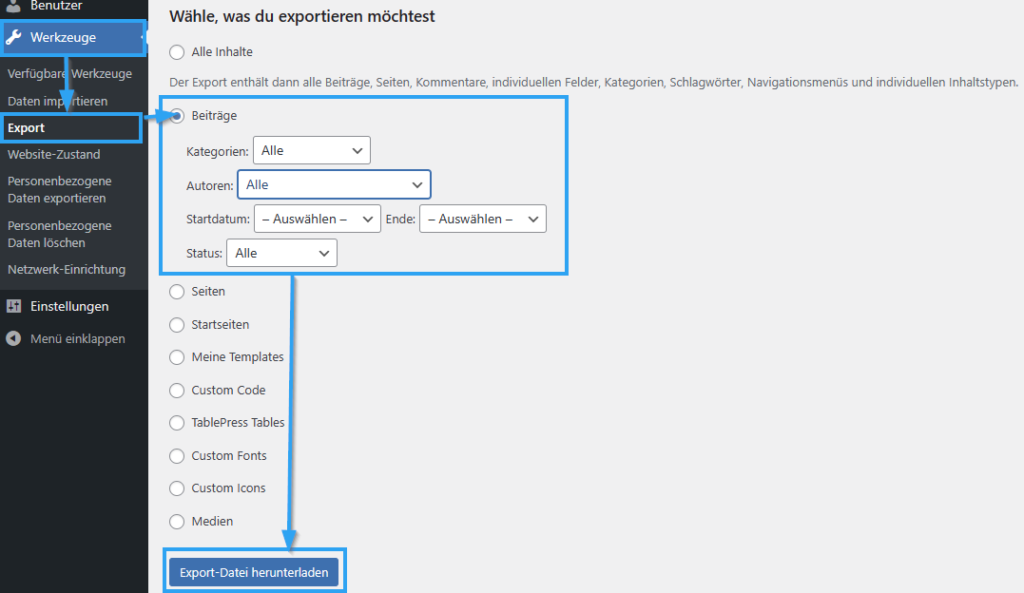
Next, download an XML file. Save it locally on your computer so you can import it again later.
1. Import posts:
If you want to import a file exported via WordPress Exporter, you can do so under Tools > Import.

If the import is not yet installed on your website, you can do so natively here. Just click on „Install now“.
After successfully installing the importer, click on „Run Importer“. Then click the „Choose File“ button and upload the XML file you previously exported.
Backup plugins for WordPress
In addition to the „UpdraftPlus“ plugin mentioned earlier, there are other WordPress backup plugins available. Based on my experience, I can also recommend the following plugins for your website:
- BackWPup
- WP Staging
- BackUpWordPress
- BackUpBuddy
Due to the disadvantages of WordPress backup plugins, I recommend using only one plugin for creating backups. Use a different method from the blog post as your second method.
What you should keep in mind with WordPress backups
Backups are very important, especially in emergencies, in order to be able to restore your website. To ensure you have clean backups that will actually help you in an emergency, we have gathered some recommendations for you.
Regularity:
Do not only keep your website up to date, but also create regular backups of your website. If restoring a backup becomes necessary and you only have an outdated backup, you will be very upset!
Completeness:
Create full backups of your website (all data + database)! If you only have a backup of a part, you cannot fully restore the old state.
Multiple storage locations:
Store your backups in different locations so that, in case of an emergency, you have a backup of your backup. We recommend at least two different locations.
Sort:
Sort your backups and use consistent names. This way you always know immediately which backup was created when and for which project. For example, name your backups: Backup_ProjectA_Date
Fuse
Encrypt your backup files additionally or put them in a ZIP folder. This provides additional protection for the data against unauthorized access.
Testing:
Run regular tests of your existing backups. This is the only way to ensure that your backups will actually work in an emergency. You can use a dev environment for this.
Frequently Asked Questions About WordPress Backups
How do I make a WordPress backup?
There are several ways you can create a backup of your WordPress website.
The easiest way is to install a backup plugin, such as UpdraftPlus. There you navigate to the settings and click on „Backup Now“. After that, the plugin creates a backup of your website for you.
Alternatively, you can create a backup in your host's hosting interface, back up the data manually, or hire a service provider.
How large is a WordPress backup?
The size of the backup depends on the size of your website and the corresponding database.
So if you have a website of around 2 GB and a database of 500 MB, your backup will be about 2.5 GB in size.
Where can I find my created WordPress backup?
That depends on the way you created the WordPress backup.
Via WordPress hoster: Usually in the hosting interface under „Backups“.
Via WordPress Plugin: In the settings of the WordPress plugin or in your website's file directory.
Via manual export: On your PC, in the specified location.
Via service provider: Very individual, presumably in a cloud.
How many backups should you have?
I recommend having at least two backups in two different locations.
For example, you can save the backups locally on your PC, in a cloud, or on an external hard drive. This way, if an emergency occurs, you always have a backup of the backup.
How often should you make backups?
How often you should create a backup of your website depends on various factors. I recommend that you always have a current backup of your website. This way, if you have a problem with your website, you can always restore a backup with the most up-to-date status.
If you have a shop, I recommend creating daily backups of your site. For large shops, it can also make sense to create a backup twice a day.
If you have a website where you make regular changes and receive comments from visitors (user-generated content), you should ideally create backups daily.
If you only have a static website where no changes are made, a weekly backup may suffice.
I always recommend creating a backup before making major changes to your website, installing a new plugin, or switching your theme.
As you can see, the answer to the question is very individual. The rule of thumb is: the more frequently changes are made to your website, the more often you should create a backup of your website.
How much does a WordPress backup cost?
There are various ways to create a WordPress backup for free:
Your managed WordPress host creates backups for you, via WordPress plugin or manually.
When you choose a service provider to create backups of your website, the cost is usually between 10 and 20 euros.
Conclusion on WordPress Backups
WordPress backups can restore a state of your website in an emergency. Ideally, you can restore a backup with just two clicks. After that, visitors can access your website as usual again.
To create a WordPress backup, you have several options available: via the WordPress hosting interface, with a WordPress plugin, manually via FTP and phpMyAdmin, or you can hire a service provider.
We recommend creating backups via two different methods. If one of the two backups is corrupted, you will have an alternative file. A managed WordPress host creates backups for you every day by default and keeps them for you for a minimum of 7 days. In addition, use the free WordPress plugin Updraft, for example.
When creating and securing your backup, ensure regularity, completeness, clean naming, and store the backups in at least two different locations.
If you follow the instructions and our notes in the guide, you will always have an up-to-date, complete, and secure backup file of your WordPress website.





 Deutsch
  English