


Importance of web analytics
At its core, the importance of web analytics lies in gaining valuable insights into the behavior and interactions of your website visitors. By tracking the data and then analyzing, for example, page views, clicks, dwell time, demographic information and subsequent conversion, companies and website operators can gain important insights. With these results, websites and online stores can be further optimized and subsequently achieve their own business goals.
Comprehensive web analysis with Matomo makes it possible to understand and interpret user behavior on a website. It is possible to track where your visitors come from, which page they subsequently click on and which page they leave.
This allows you to easily identify where your website needs to be optimized, which marketing channels are most effective and which content and functions arouse the interest of visitors.
Simply follow these instructions to quickly install and set up Matomo. Your visitors will then be tracked successfully.
Installation of Matomo
The complete setup in 6 steps
- What you need for the installation
- Minimum requirements for the operation of Matomo
- Download Matomo
- Upload to your web server
- The 5-minute installation of Matomo
- The classic Matomo Javascript code for your website
Step 1: What you need for the installation
There are a few important points to note before starting the installation:
1. own web hosting or web space:
Matomo can only be operated on your own web server or web space. Platforms such as Jimdo, Shopify or WordPress.com generally do not allow installation. In such cases, there is either the option of using the Matomo Cloud or a separate Matomo Hosting to acquire.
2. access data and access options:
You will need the access data for access via FTP or SFTP or a file manager from your Hosters. If you use WordPress, you also have the option of using the Matomo for WordPress plugin instead of a separate installation. However, it is important to bear in mind that when you switch from WordPress, the data you have collected so far will also be lost.
3. FTP client or SSH client:
You need an appropriate program to transfer the Matomo files to your web server. This is an FTP client or an SSH client. If you have no experience with this, please check the information provided by your provider. They often offer help pages explaining how to obtain access data for your web hosting and how to work with such programs. If your host does not offer a file manager, I recommend the FileZilla tool.
It is important to take this information into account and, if necessary, obtain further details and instructions from your hosting provider to ensure a smooth installation of Matomo. Individual hosting settings may vary, so it is advisable to follow your provider's specific instructions. If you are already a customer of WPspace you are welcome to ask us your questions via the support chat! 😊
Step 2: Minimum requirements for the operation of Matomo
To be able to use Matomo, your web space must fulfill the following requirements:
- Web server such as Apache, Nginx, IIS, LiteSpeed etc.
- PHP version from 7.2.5 or higher. Matomo also works perfectly with PHP 8.
- PHP extension pdo and pdo_mysql or the mysqli extension
- MySQL-Version 5.5 or higher or MariaDB
The operating system of the web server does not really matter. Both Unix variants and Windows can be used without any problems.
Step 3: Download Matomo
Matomo is an open source software that can be easily downloaded. Matomo is made available in a so-called ZIP archive.
You can download the tool at the following link: https://matomo.org/download/.
After downloading Matomo, you must unzip the ZIP file on your computer. If you do not have an appropriate program for this on your Windows or Mac system, you can download the program WinRAR download. For a maxOS computer, for example, there is the program Stuffit.
Step 4: Upload to your web server or web space
We recommend that you use a separate subdomain for your Matomo installation. This would give you a separate installation with a separate domain for your installation. This could be called matomo.your-website.com, for example. You could log in there in future with separate login data and make all settings.
After you have unzipped the ZIP file on your computer, you will find a folder called "matomo" and a file called "How to install Matomo.html". In the file you will find an English installation guide.
Now open your FTP client and upload all files and directories from the "matomo" folder to the desired location on your web server.
Tip: When you create a new subdomain, there is often an index.html file in the folder. You should remove this after setting up your subdomain. Otherwise, the installation file cannot be called up as desired.
Step 5: The 5-minute installation of Matomo
Now open your web browser and enter the address you have chosen for your installation (see previous step). If everything has been uploaded correctly, you should see a welcome message in front of you.

System check
During the system check, the system checks whether the server meets the requirements for a correct installation. If everything is OK, you should see green ticks everywhere. If something is wrong, you will see a red X and need to check what the error is. For many problems, the installer already provides help so that you have immediate clues.
If all requirements are met, click on "Next".

MySQL database setup
Now we need a new and empty database for the installation. For this you need the access data for MySQL or MariaDB, which you should already have when creating a new database on your server. If this is not the case, you should change your Hosters contact. The host name or IP address of the database server, the database user name, the password and the name of the database are required.
If you create a new database, you should always save this information in parallel.
Once you have entered all the data, click on "Next".
Note: When creating a new database, make sure that you create a new user who only has access to the Matomo database.

Create the tables
You don't need to do anything else for the next step. The tables are automatically created in the MySQL database. As soon as the step has been successfully completed, a corresponding message will appear and you can click on "Next" again.

Create main administrator
You can now create a main administrator. To do this, select a user name of your choice and choose a secure password. Enter your e-mail address and select whether you want to receive updates and newsletters from Matomo or not.
Note: It is best to use a password manager so that you do not lose your access data.
Please also note that the user name of the main administrator cannot be changed at a later date. You can only create additional "super users" and additional administrators at a later date.

Add the first website
Once you have created your user, you can add your website directly. Enter the name of your website and your URL. Select your time zone (Germany - Berlin) and choose whether you want to use e-commerce tracking or not. This setting can also be adjusted afterwards.

Insert Matomo Javascript tracking tag
If you no longer want to make any settings in Matomo, you can now insert the tracking code on your website in the area. I'll go into this in more detail further down in this article.
However, I recommend that you make a few settings in advance and only place the code on your website after the settings have been made.
Matomo installation completed
That was it! A piece of cake, right? 😊
If you had all the data ready, it should have taken you less than 5 minutes to get to this point.
To make further settings, you can click on the green "Next" button below. This will take you to the login screen where you can log in to Matomo for the first time and have a look around.
As soon as you have embedded the JavaScript code in your website and visitors have accessed it - this can of course also be you yourself, for example for testing purposes - Matomo will track the visitor data, even in real time. You can therefore see live in the dashboard how the visitor is behaving on your website and what data is being recorded on your website.

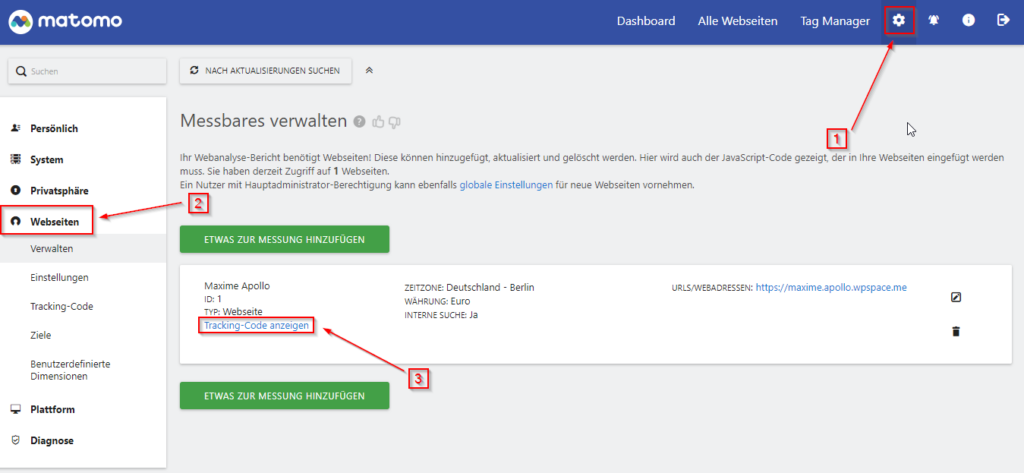
Step 6: The classic Javascript code for your website
As already announced, we want to edit our Javascript code again and make various settings. So log in to your dashboard and click on the cogwheel at the top left. Click on Websites on the left-hand side and then on Show tracking code.
Now scroll down a little further until you see the Javascript code. At the bottom you will now find the item Advanced. Click on the link "show" which is just below it.

You will now be shown some options for your Matomo Javascript tracking code. These include the "Disable all tracking cookies" option. This function is particularly important if you want to analyze visitor data without having to request user consent.

Important: Inform yourself about the GDPR requirements and your project. We cannot offer you any legal advice with these installation instructions and therefore do not constitute legal advice!
Now copy the prepared Javascript tracking code from Matomo and paste it into your website, if possible in the <HEAD> area. The Matomo tag should be inserted in the header area of the HTML so that it can log the activities as early as possible. This enables Matomo to also record information about the loading time behavior - and this is increasingly important with regard to the so-called "Core Web Vitals", which Google uses to determine the position for search results.
Conclusion
Matomo offers you as a website operator a powerful and privacy-friendly alternative to web analytics compared to other solutions such as Google Analytics. You retain full control over the data collected, as it can be operated on your own web server or web space.
Although setting up Matomo requires some basic technical knowledge, especially when accessing the web server via FTP, SFTP or shell, Matomo's user-friendly interface and numerous customization options make it a very accessible solution for website operators.
By installing and correctly setting up Matomo, you as a user can retain full control over your collected data and at the same time obtain meaningful information about visitor behavior and the performance of your website. As a website operator, you can use this data to optimize your online strategy, improve the user experience and ultimately achieve your business goals more effectively.


One Response
Hi Axel, thanks for the detailed instructions. I have booked Matomo with you and am currently setting it up. Is it possible to set up Matomo so that it first works with all tracking cookies deactivated in order to bypass consent and track in any case, and then extend tracking to cookies once consent has been granted (e.g. via the consent management plugin in WordPress)? This way you could ensure that 1. you track everything and thus know how many visitors you really have and 2. you get more accurate data if you have consent (which unfortunately only about 2/3 of users do). I'm looking forward to your feedback. LG Clemens