
This WordPress tutorial explains the basic functions of WordPress.
The dashboard: the linchpin
This WordPress tutorial starts at the point after you have successfully logged in to WordPress. The first thing you will come across is the dashboard. Dashboard is therefore the first term we will deal with in this WordPress tutorial.
The WordPress dashboard is your hub when it comes to installing plugins or themes and setting up content such as blog posts.
If you have decided to use the Divi Builder to design your website and need help installing the Divi Theme, you can here drop by.
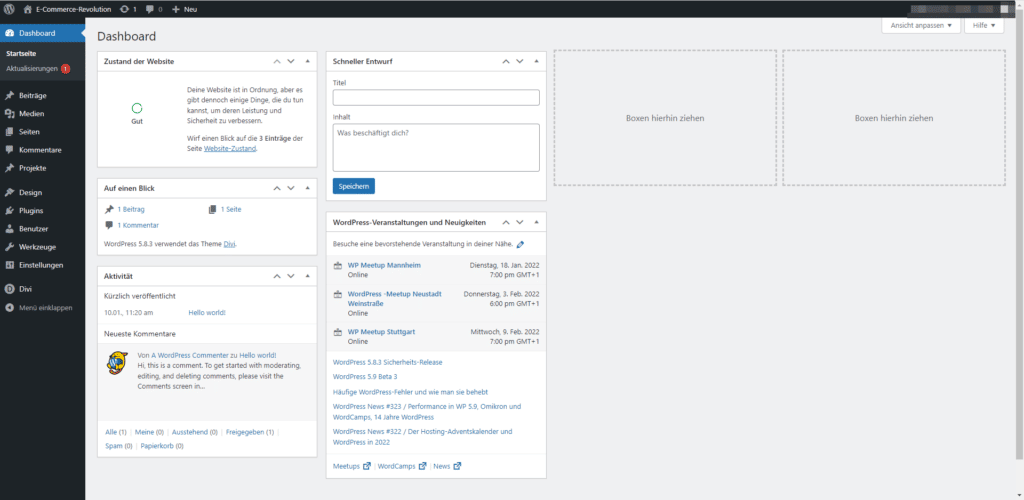
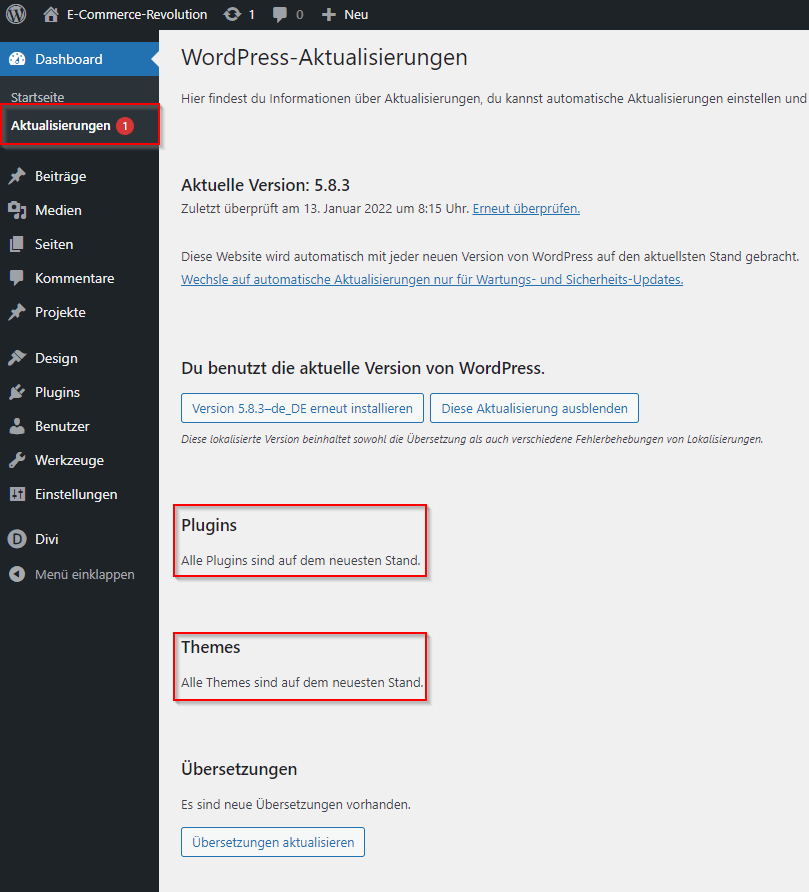
The "Updates" subpage shows you the version status of your plugins, themes and WordPress installation. You can find the "Updates" subpage in the left-hand column under Home, which is located under Dashboard. The more plugins you install, the more options you have for customizing your dashboard.
This is the case with WooCommerce to display the most important sales statistics or an overview of orders.
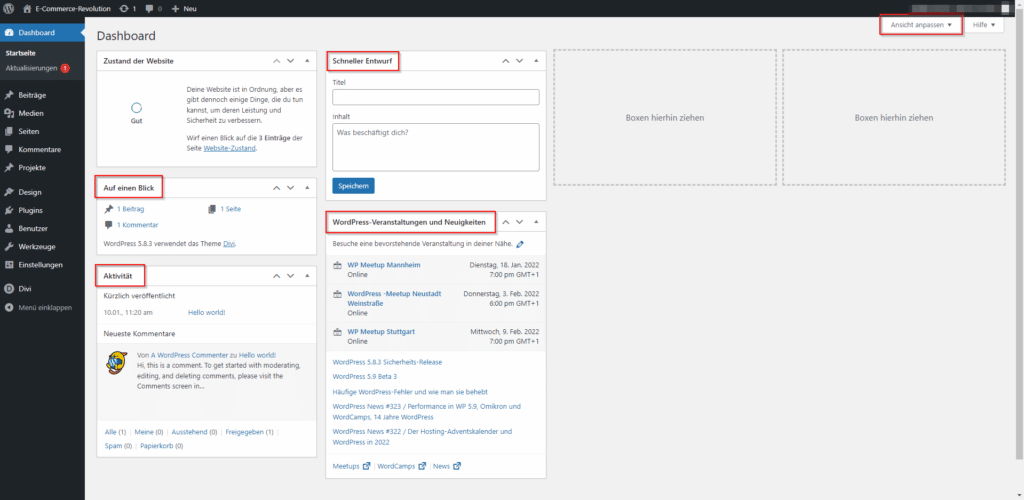
You can set up the overview of your WordPress dashboard as you wish. I'll explain how you can customize your overview in the following section of this WordPress tutorial. Under the "Customize view" option, you can select which screen elements should be displayed and which should not by simply checking the box.
At a glance
"At a glance" gives you an overview of your content, version and templates. More precisely, you can see the number of posts and pages that have been published on your blog. Click on the terms highlighted in blue to go directly to the relevant page or post.
Fast design
"Quick draft" allows you to make notes for future posts, for example. As this draft is not published, you will find it marked as "Draft" in your post list.
Activity
"Activity" acts as a logbook that shows you your most recent activities in your WordPress blog. If you need a quick overview of your most recently published posts or want to access them quickly, this function is very helpful.
WordPress news and events
Just like the "Activity" function, "WordPress news and events" provides you with an overview of news relating to WordPress and indicates future WordPress events.
The first step of the WordPress tutorial has already given you an overview of the dashboard. In the next steps, we will dive deeper into the respective menu items so that you know your way around WordPress better than you know your pocket.
Get to know posts with this WordPress tutorial
The next point we will deal with in this WordPress tutorial is posts. Briefly summarized, posts in WordPress are content that is collected chronologically on a post page. In most cases, WordPress posts are blog posts.
So-called tags or keywords help to group posts according to thematically relevant terms. This also allows you to categorize and sort your posts at the same time. With the help of the posts page, you can get an overview of the posts and are redirected to the respective post by clicking on it.
WordPress was originally developed as a blog system, which is why posts are one of the fundamental elements in WordPress. As previously mentioned, blog posts are sorted. New posts are always displayed at the top and take the place of older posts, which are moved further down the list as time goes by and more blog posts are added.

Next, in this WordPress tutorial, I would like to explain how you can create a WordPress post. To do this, you need to click on "Posts" in the left-hand column and then on "Create". An overview should then open in which you can create the post.
You can define a heading in the top column and write your post in the text field below. You can edit the text to your liking using the editor. Once you are happy with your post and want to publish it, all you have to do is click on the "Publish" button on the right. This allows you to create posts such as this WordPress tutorial.
Before you click the button, I advise you to check your post carefully, otherwise your post will be live and visible to everyone. Before publishing, however, there are other options available to you that you may want to make use of. These are located next to the "Publish" button and offer you the following functions. Firstly, you can simply save your post under the "Save draft" option so that you can continue working on it in the future. Under "Preview" you can view your own post while it is not visible to others.
Under "Visibility", you can choose between three options. The first is "Public", which makes your post visible to anyone who visits your website. Another option available to you is to publish your post "Password protected". In this case, only people with the relevant password will have access to your post. The last option would be to publish the post "Private". In this case, people would only be able to see the post if they are logged in to your website. We have now covered all the post tabs in this WordPress tutorial.

As mentioned at the beginning of the WordPress tutorial, posts can be categorized and sorted. Depending on the category, the posts can be found under the respective category pages. You can find the settings for the categories on the right-hand side while editing the post. There you can define the title of the respective categories under "Create new category". As soon as you have created your own categories, you can also assign posts to them. The categories organize your posts thematically, while tags (keywords) organize your posts in terms of content.
As with the categories, you will also find the tags on the right-hand side. You can enter several words here, just make sure you separate them with a comma. Click on the "Update" button to save your changes.

Media: The overview of all your uploaded data
Next up in this WordPress tutorial is the "Media" tab. The media library is located under this tab. You can primarily add images to this, but also videos and other documents that you need for your WordPress site. Once you have added images, for example, you can then edit them directly. You are offered functions such as size corrections, image cropping, image alignment, etc.

Pages: Homepage, Imprint and co.
Almost halfway through the first half of the WordPress tutorial. Now it's about the pages, which, unlike the posts, are not sorted by date - but by name - and are not listed in archives.
Pages cannot be assigned categories or tags like posts. This is because pages are usually static content. Typical pages of a website are the "Homepage", "About me", "Imprint" or "Terms and conditions".
You can use various page builders to customize your pages. The giants on the market are Elementor and the Divi Builder. If you're an absolute newbie in the WordPress world, I recommend using a well-known page builder. They not only offer great support, a dedicated community, regular updates, ready-made and compatible themes, but also many WordPress tutorials on the respective providers.

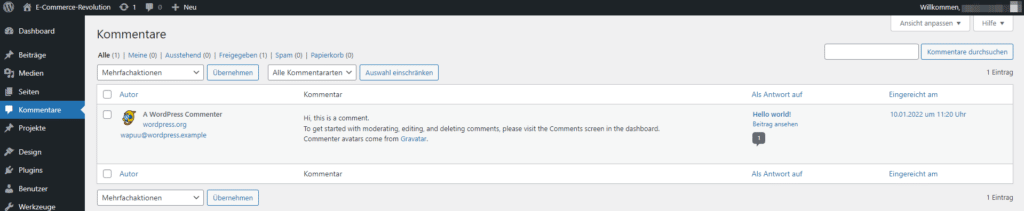
Comments: Love your community
The "Comments" menu item is almost self-explanatory. The comment function allows your readers to comment on your posts. The comments are usually located below the post. They are displayed one below the other by default. If you want to reply to certain comments, you can activate the option "Organize nested comments in x levels". This will display the comments more clearly if you want to reply to them.
Tip: Interact with your readers! This not only shows appreciation, but also attracts regular visitors.
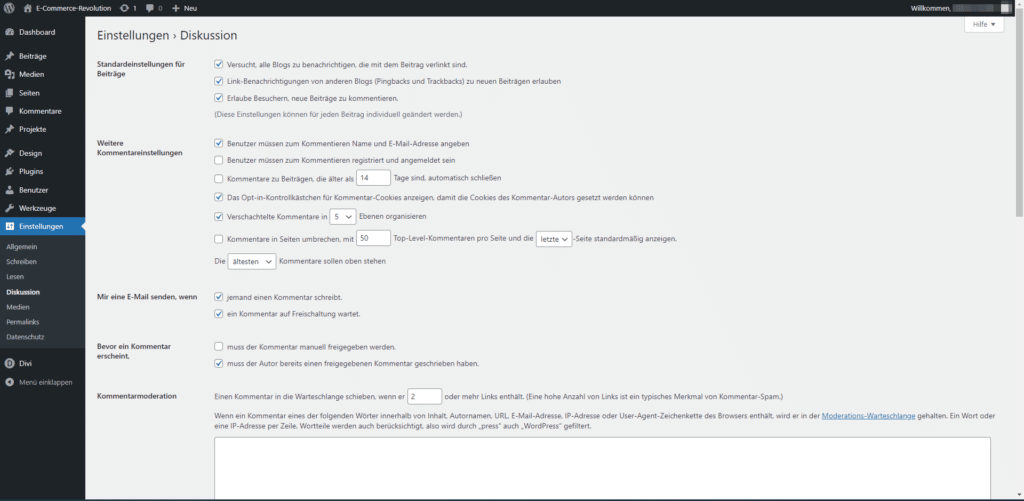
Unfortunately, websites are often affected by spam comments. You can tackle this manually by approving each comment for publication yourself. The simpler and less time-consuming solution would be to install a plugin that automatically recognizes spam comments so that you no longer have to deal with them. Of course, you can also deactivate comments for your posts. To do this, go to "Settings" and then to "Discussion" and uncheck "Allow visitors to comment on new posts".
Depending on how you have configured your WordPress, it is possible to connect with other WordPress blogs using so-called "pingbacks" and "trackbacks". Pingbacks and trackbacks basically have the same function, but they differ in one respect:
- Pingbacks are created when a visible link is placed on a homepage to another page.
- A trackback occurs when no visible link has been set, but a link in the background of the system, which simulates a pingback.
This function can be configured under the Tools tab. So now we have successfully mastered the first half of the WordPress tutorial.
Design: The look of your website
Of course, the Design section is a must-have in a WordPress tutorial. Here you will find all the visual settings for your website, from color and layout to logos. In addition to these, you can also choose between different themes and widgets that influence the appearance of your website. The main menu and all submenus are also available for editing here. You can also insert your own codes in the theme editor, but I would only recommend this to those who are really familiar with it.

Install plugins with this WordPress tutorial
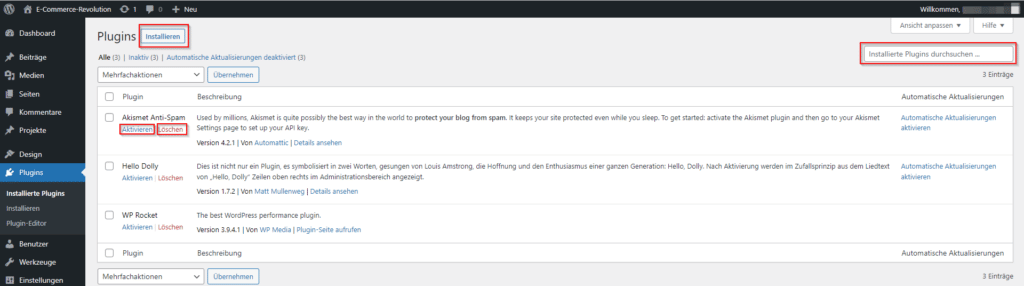
We have already talked briefly about plugins in the comments section and will come back to this point in the WordPress tutorial. Plugins are additional programs that you can add to your website and add new functions to it.
If you open the Plugins tab, you will find an overview of all the plugins installed on your website. Plugins with a white background are deactivated. You can either activate or delete them. As soon as the plugin is active, it is highlighted with a light blue background. WordPress offers a lot of useful plugins that you can try out.
Trying out different plugins is often a good idea, as most plugins are initially free and a paid license is only required for the premium versions. If you decide against a plugin, delete it afterwards so as not to burden your memory and performance unnecessarily.
Users: Who can edit what on the website?
WordPress can be operated by several users at the same time. I'll show you exactly how this works in this WordPress tutorial.
In WordPress, it is possible to assign different user roles and user rights to the respective user. This administration is only possible for the administrator. They are also able to add or remove new users. To add a new user, select the "Users" tab and click on the "Add new" button.

An overview should then open in which you should enter your username, email, first name and surname etc. In the following, I will explain the meaning of the individual fields in this WordPress tutorial.
The username is used to log in to WordPress alongside your password. Please note that the username must not contain any spaces. The password and login will be sent to the specified email address.
You can enter the surname and first name of the user in the First name and Surname field. Please note that if no name has been entered, the user name will appear next to the posts. This makes it easier for hackers to hack into your account, for example, as they already have the user name and only need the password. I therefore recommend that you always fill in the last name and first name fields.
The Website field does not have to be filled in, but if you create a user for guest authors, it makes sense to enter their website there.
Under Language you can set the language of the website.
WordPress creates a very strong password, but it is up to you whether you use this or create one yourself. When the user is saved, the access data is sent to the previously defined email.

After the password, you define the user roles of the user. The individual roles and their authorizations are now discussed in this WordPress tutorial.
Subscriber
The subscriber is a normal user who is registered on your website, has their own profile and can edit it. They are also able to read and comment on posts if the comment function is enabled for everyone.
Employees
Contributor is one level above the subscriber. This means that the contributor has all the rights that the subscriber has and, in addition, they are authorized to write articles but are not authorized to publish them.
Author
The author has the same rights as the employee, but is authorized to publish his own contributions and upload images to the media library, which the employee is not authorized to do.
Editor
After the author comes the editor. They have all the aforementioned rights and are also authorized to create pages and edit categories.
Administrator
The highest level is the administrator. Users in this role have all rights. In addition to the aforementioned rights, the administrator can change themes, administer the basic settings and delete the entire WordPress blog. As a rule, only one person has this role. In addition, this user role should only be used for website administration, as it is easy to inadvertently change important blog settings. I therefore recommend that you use the editor user role for editing posts and pages and commenting on posts.
If you want to expand your WordPress site with a store system such as WooCommerce, you will have additional user roles to choose from.
Customer
The customer role can be created manually or is created automatically at the checkout as long as the customer does not order as a "guest". They are authorized to view their orders and edit their customer information.
Store Manager
This role is able to manage the entire store. This means that they can create and edit products, change prices and influence the store functions. This role also has all the rights of the customer.
To complete the addition of a new user, simply click on the "Create new user" button. You can change the assigned role at any time later as an administrator.

Tools: Importing and exporting data
The term tool is used somewhat broadly by WordPress. That is why this is the shortest point of the WordPress tutorial. Tools are primarily used to import and export data. This data can be pages or posts from your own website or data from other WordPress installations.

Settings of your website
The last point of the WordPress tutorial contains the settings. Under this point you will find settings regarding posts, comments or pages etc. but also regarding the appearance of the website. If you install additional plugins, further items will be added to the settings.
General
Under the general settings, you will find basic settings regarding users, time zone, the page URL and the WordPress address. This allows you to specify the path via which WordPress can be accessed.

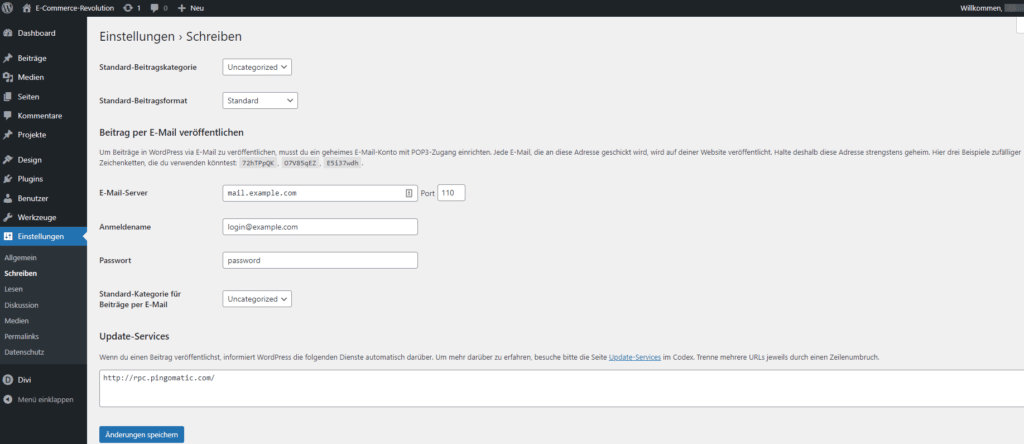
Writing
Here you can specify whether you want to publish your post by e-mail and define the standard category and format for posts.
Read
Under "Read" you can set which content should be displayed on your start page; you can choose between a static page or the last post. As a rule, you select "A static page" for a website and "Your latest posts" for a pure blog
There is also an important setting here: Configure the visibility of your website for search engines. This is because the option "Prevent search engines from indexing this website" is listed here. If you check this box, this means that your website can only be found indirectly via the search engine index. Your website can be found via organic search queries if you have not checked this option.

Discussion
This item allows you to define general settings for comments and configure the pingback and trackback function. You can also change the appearance of the WordPress avatars here.
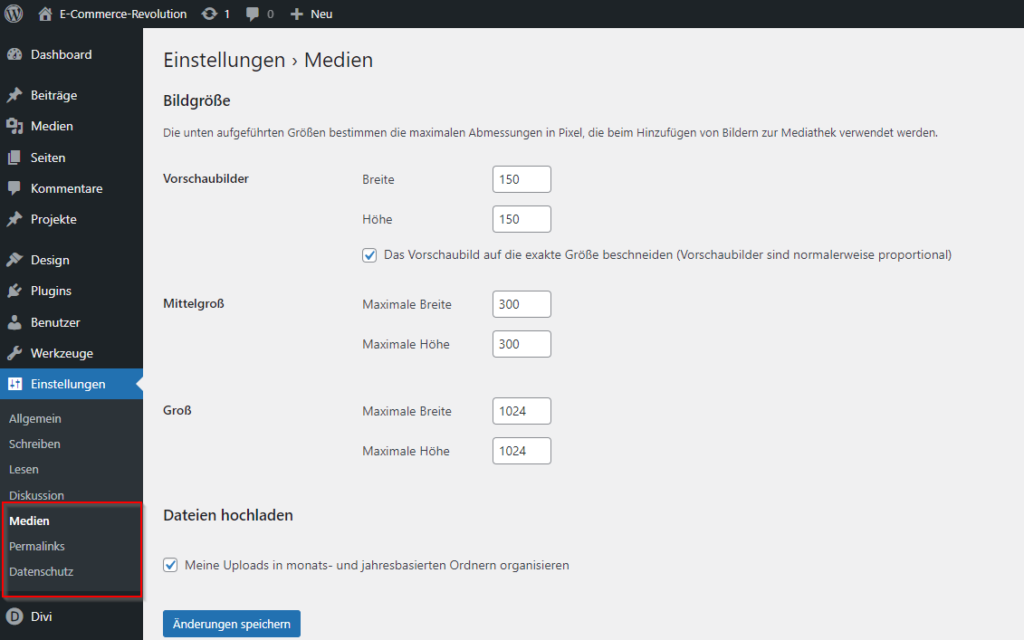
Media
Settings for uploading images are made in Media.
Permalinks
Here you can set the structure of the URL of your website - this will also Permalink structure mentioned. Short link structures would make sense from the point of view of search engine optimization, for example.
Privacy
Under this setting you can define the page that should be displayed when you click on the privacy policy of your website.
Conclusion: Get to know WordPress with this WordPress tutorial
In this WordPress tutorial, we have covered all the important points and functions of WordPress. Because WordPress is now so much more than just a CMS system - it's the basis for your new website! If you still have questions about the individual tabs after this WordPress tutorial, then take a look at our article "What is WordPress?" over. More useful WordPress tutorials are sure to come in the future, so visit our WordPress blog regularly to stay up to date. Would you like a WordPress tutorial on a specific topic? Then write to us!