


The most important settings before you start working in Divi Builder!
With over 800,000 installations, 200 layout packs, 70,000 Facebook members, countless extensions and 50 local groups, the Divi theme from Elegant Themes is one of the most widely used WordPress themes in the world. The Divi Builder not only comes with a huge wealth of great designs, but also has a diverse number of different functions with which a website can be equipped. That's why it's so popular!

Set up Divi Theme
If you are planning to use your WordPress website with the Divi theme in the future, it is important to set up your site properly in advance. And not just within the Divi Builder, but also in the WordPress Customizer, which many people forget. A proper setup in advance will save you a lot of work later when creating your content. Sounds logical. And it is. You can find out how to install Divi and therefore the Divi Builder here here read more.
The WordPress Customizer contains numerous setting options that can fundamentally change the appearance of your website. It is therefore always a good idea to think in advance about how you want your website (e.g. color palette, fonts, navigation, footer, website layout, etc.) to look later on. Write everything down and only get to work when you're ready. Good planning is half the battle.
My tip: take your time now so that you can save time later!
Here we go - First steps in the Customizer
There are two ways to access the Customizer (Divi Builder should already be installed and activated). Either via the Design - Customizer tab or directly via Divi - Theme Customizer. Both ways lead to the goal. If you click on it, you will find a menu bar with different settings on the left-hand side. You can also see which theme is currently active. The Divi theme (or the corresponding child theme if you are already using it).

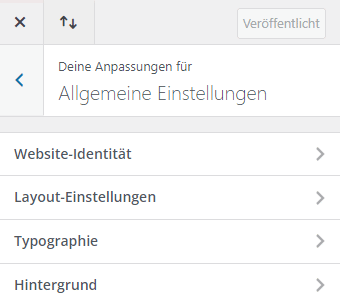
The general settings for your Divi page
Let's start with the general settings. Clicking on the "General settings" menu item opens a submenu with the various settings for setting up your website. Of particular interest to us are the "Layout settings" and "Typography" tabs in the Divi Builder.
Layout settings
In the first step, you can decide whether you want to use a box layout or prefer to use the standard layout of a website. The box layout gives the website a left and right margin. It is also often used for pure blogs.

Then set the width of your website content under "Website content width". The default value of 1080 px has proven itself in practice, so it makes sense to leave the default value as it is.
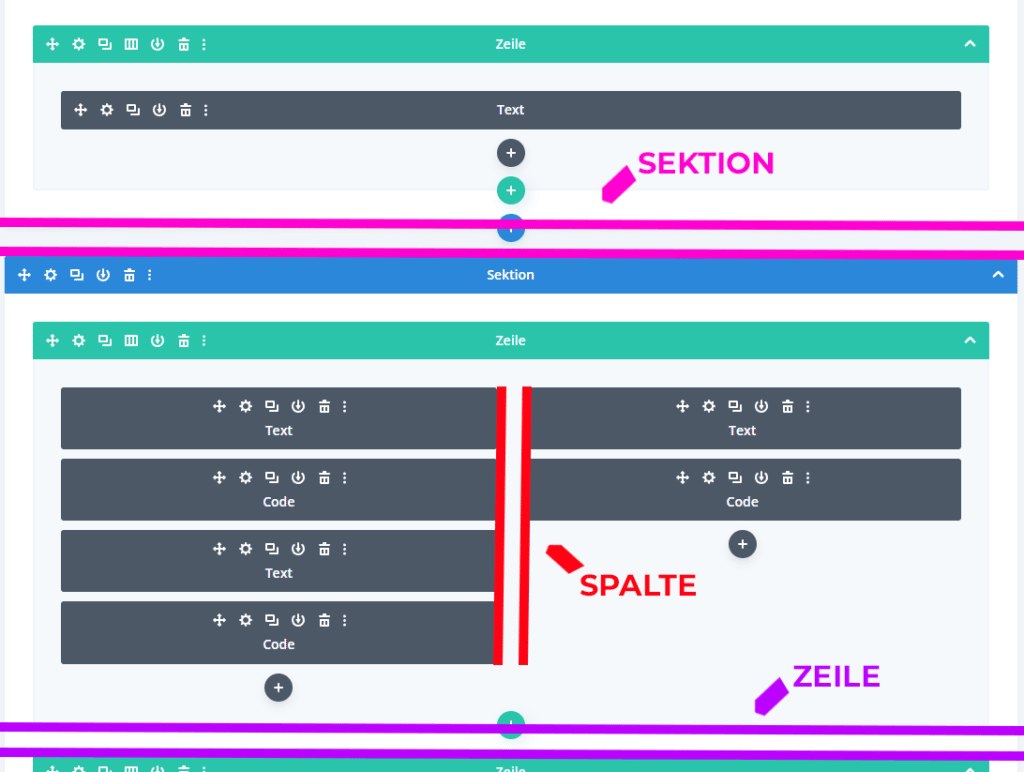
The next setting with the name "Column spacing of the website" is, in my opinion, somewhat incomprehensibly translated in the Divi Builder. This is the margin between the columns within a row. For example, if you create a module with three columns within your website, this point controls the spacing between the columns. The Divi Builder defines the whole thing in numbers from 1 to 4, which result in the following values as percentages.
1 stands for zero distance between the columns.
2 stands for a right margin of 3% between the columns.
3 stands for a right margin of 5.5% between the columns.
4 stands for a right margin of 8 % between the columns.
If you want to use a sidebar for your website, you can define the width of the sidebar in the Divi Builder via the item "Use custom width for sidebar".

The upper and lower spacing for each section or line can be defined under "Section height" and "Line height". A little tip: A higher spacing gives a website more "space", which has a positive effect on readability. And now to the last point Accent color: This controls the color for various elements on your page (such as the hamburger menu, background color for the secondary menu bar, active link... etc.).
Don't worry, you can adjust the color more precisely in the settings for the respective elements in the Divi Builder. The good thing about this is that you are not fixed here. As a tip, I would definitely choose your accent color from your color palette. This will be displayed as soon as you call up a new element and not the standard WordPress color.

Typography
Under Typography, you can define the Divi Builder default settings for fonts. Very practical, because once defined, your pre-set fonts/line heights/font sizes etc. are displayed with every new module. In my opinion, this is one of the most important settings in the Divi Builder.

There are two selection fields for typography here, which are the most helpful for the later structure of your website - namely Header font and Main font. Under the term "Header font" you can set the font for headings and under the keyword "Main font" you can set the font for the body text. You also have the option of directly adjusting the font size and line height in the body.

As far as the colors are concerned, you can adjust the colors for the font in the body and for links here. The link color is identical to the accent color, which you can set under "Layout settings", unless you change it here.
Wow, that was quite a lot. But most of it is done. Because we've already made some settings for the Divi Builder and your new website. Now it's time for the finishing touches.
Set up header & navigation

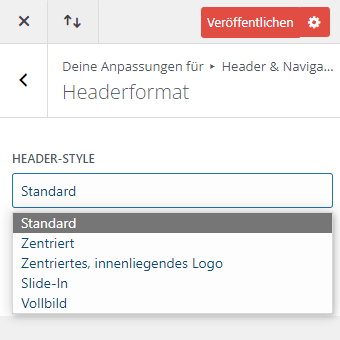
Header format
Let's jump straight to the "Header format" sub-item in the Divi Builder. Here you can easily create your desired menu from various options. A small note: If you decide on a centered menu, your logo will also be displayed centered, otherwise left-aligned. You can also decide here whether you would prefer to have the menu in the header area or integrated vertically into the sidebar.
Primary menu bar
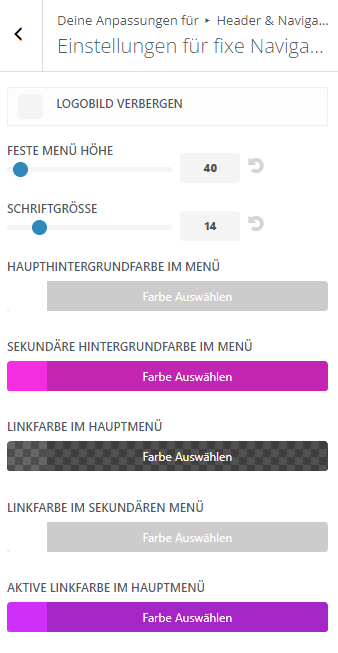
Don't be surprised! At this point in the Divi Builder, you might assume that the primary menu bar controls the appearance of the top bar. This is not the case! The top bar (here the menu with the magenta-colored background) is called "Secondary menu bar". A little confusing, isn't it? Back to the "Primary menu bar" tab - here you can make a variety of settings.

However, I would like to focus on the following point: "Logo max height". I am often asked what size the logo should be so that it integrates well into the menu.

The following applies to the desktop version: For a logo in landscape format, a minimum height of 45 - 55 px and a minimum width of 250 px has been established. A logo format of 90 x 500 px is ideal. The PNG format, which can also be used to display transparent logos, is the most suitable image format. In addition to the menu height, the font size in the menu also plays an important role in how your logo is displayed. Here you can play around a little with the values in the Divi Builder until you have found the ideal display.
As the display of square or portrait logos in standard menus is not always optimal, it is advisable to have a variant in landscape format in addition to your main logo. If you do not have one, you can alternatively solve this problem by displaying your menu bar in a different way, e.g. a centered menu. Another alternative is to remove the logo from the menu and display it centered on the page. There are many possibilities here in the Divi Builder.
The following applies to the mobile view: less is more. Logos with a lot of text or elaborate elements that would appear illegible if reduced in size can also be displayed on mobile devices. The trick: Many designers resort to scaled-down logos that only include part of the logo text, e.g. in the form of initials, or contain fewer image elements.
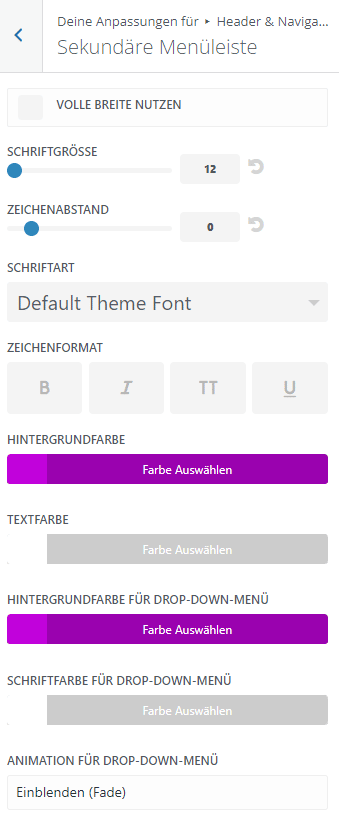
The top menu or the secondary menu bar
As previously mentioned, the secondary menu bar is the bar that is located above the primary menu bar or the main menu. It is often used to display contact details or social media buttons. The settings are similar to the settings of the primary menu bar and are self-explanatory, even for beginners.
Settings for fixed navigation
And again, it is not really clear what exactly is meant by this. To clarify, these are settings for the primary menu. The settings take effect when you want your menu bar to be displayed fixed in the upper area. The default setting is that the elements in the menu become slightly smaller when scrolling. If you do not want this, select the same element settings here as in the "Primary menu bar" area.
Header elements
Here you can activate the elements that you would like to have displayed in your secondary menu bar, such as social media icons. The link to the social media icons can be set in Divi under Divi - Theme Options - General.

If you want to know where the search appears. This is displayed in the primary menu bar.
Buttons, buttons, buttons
To avoid having to start from scratch every time you create a new button, it makes sense to define the button style in advance in the Customizer. You can find the settings for buttons under Design - Customizer - Buttons (Button).

Here you will find two sub-categories, the general settings for buttons "Style of the button (button)" and the settings for the hover mode "Style of the button (button) on hover". Hover mode means that you hover over a certain element on a website, in this case a button, and the appearance of the element changes, e.g. by changing the button color. This is the hover effect.
The hover effect makes your website more interesting for users. You can also adjust a whole host of settings for your button, in particular the background color, border, font, icon, ... etc.
What cannot be set here are gradients for button backgrounds and you can only define a single button style here. If you would like to use two button styles (e.g. one button for dark backgrounds and one for light backgrounds) or add gradients, I recommend that you set this up directly in Divi Builder and save these button(s) as global element(s) in the library. This gives you the option of always being able to access them if required.
So that's it for this tutorial on the most important settings in the Customizer.
A few final words about working with Divi
As you can see, it is not difficult to set up your new Divi website in advance in the Customizer using the Divi Builder. With a little practice and good planning, the customizations can even be made in a relatively short time.
And it's already worth it if you want some elements of your website to be predefined and you only need to fill them with your content (such as call-to-action buttons or body text). Even if it may seem a little cumbersome at times to make detailed adjustments, I can tell you from personal experience that the time spent will be more than worth it. Afterwards, you can devote yourself to your website with complete peace of mind. So it's best to just give it a try!
Hopefully you enjoyed the tutorial and it helps you to set up your website. If you have any further questions or comments, we'd love to hear from you. Let us know how you got on with your new Divi website, show us your new website or anything else you can think of about WordPress.
We are delighted about this.

One Response
explained briefly and crisply, thank you very much