

You try to access your WordPress website, but instead of your content you get a white page with an error message: 403 Forbidden. Don't worry, because you can fix this error message independently in a short time without external help.
The error can have various causes and scopes. Depending on the cause, the Homepage of your WordPress websiteindividual subpages or even the entire website cannot be accessed.
To make your website accessible again as quickly as possible, I will describe the causes of errors and possible solutions below. If you apply the solutions, your website should be fully accessible again.
Explanation of the "403 Forbidden" error
Simply explained 💡: The "403 Forbidden" error tells you that you are not authorized to access the requested resource.
The 403 Forbidden error message is an HTTP status message. It occurs when a server (the basis of your hosting) denies a client (e.g. your browser) access to a certain resource. There are various causes for the error, the most common for WordPress are
- Damaged .htaccess file
- File permissions incorrect
- Plugin problems
There are other common reasons for a 403 error, including:
- Missing access authorizations
- IP blocking
- Missing authentication
The exact reason why the error occurs on your website can vary. In most cases, it has to do with permissions and security measures. In our article, I provide you with specific steps to help you find and fix the error.
Variants of the "403 Forbidden" error
The "403 Forbidden" error can occur in different variants, depending on the specific reason for the access denial and the configuration of the web server. Here are some of the most common variants:
- 403 Forbidden
- 403 - Forbidden
- Access denied
- You don't have permission to access this resource.
- Access denied
- You do not have authorization to access this resource.
- 403 Forbidden - nginx
Often you will only find the indication that it is a 403 Forbidden error as text in the tab at the top. At the bottom you will only find the text of one variant. Here is an example:

The error message on the "white screen" typically only shows the short text, which gives you little to no information about the cause of the error. To get more details about the error message, you can use the Logs in your WordPress hosting check.
Fixing the "403 Forbidden" error message
In most cases, the 403 Forbidden error can be fixed quickly and easily. To carry out the troubleshooting, you only need access to the root directory of your website.
At WPspace, Managed WordPress hostyou can access the root directory of your website via your hosting interface. Alternatively, you can use FTP access and a program such as FileZilla to access your root directory.
We will explain the following 10 measures step by step so that your website is accessible again as quickly as possible:
- Check URL and reload
- Delete browser cache
- Reissue .htaccess
- Adjust file permissions
- Deactivate plugins
- Deactivate CDN
- Check hotlink protection
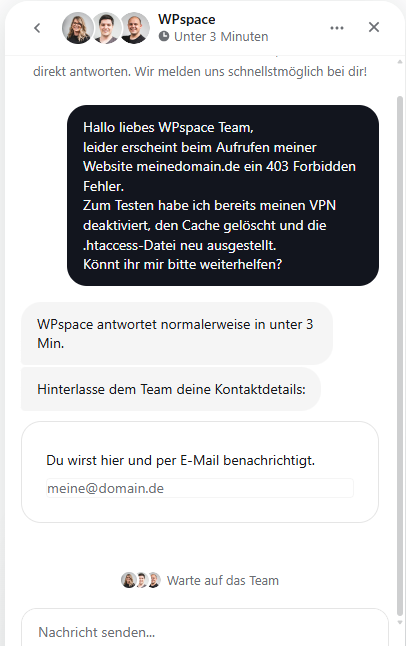
- Disconnect VPN connection
- Contact WordPress hoster
- Import backup
Check URL and reload
Does that sound too simple? Sometimes it is trivial things that are the reason for an error message. In some cases, 403 errors are only temporary.
In the first step, make sure that you have written the URL correctly. Then reload the URL that you want to call up.
Delete browser cache
Your browser cache temporarily stores a website you have accessed. To empty this cache and see the current status of the website, empty your browser's cache. Below you will find instructions for the most common browsers:
- Delete cookies in Chrome
- Delete cookies in Edge
- Delete cookies in Firefox
- Delete cookies in Safari
- Delete cookies in Opera
Note that in addition to the browser cache, there is also a Wi-Fi cache and router cache. To test whether a cached version is displayed for you, you can access the desired website using your smartphone and mobile data (important: not Wi-Fi).
Reissue .htaccess
Note 💡: If your WordPress website is hosted on an nginx server, it will not have an .htaccess file. At WPspace, we rely on Apache servers. Therefore, websites hosted on WPspace have a .htaccess file by default. You can also simply ask your hoster's support team for this information.
The .htaccess file is a configuration file for your website. You can use it to adjust settings for your website, set up redirects, control access to certain files and directories or block IP addresses, among other things.
Incorrect entries in the .htaccess file can cause a Forbidden 403 error. You can try to look for the error in the .htaccess file, but this is usually like looking for a needle in a haystack.
I therefore recommend that you delete the current .htaccess and create a new .htaccess. To do this, proceed as follows:
1. access the root directory (usually httpdocs) of your website. With WPspace, you can access it directly via the hosting interface. If you do not have this option, access it via FTP.
2. download the current .htaccess file as a backup locally on your PC / laptop

3. delete the current .htaccess file afterwards

✅ Website accessible? If you can now access the pages of your website affected by the 403 Forbidden error, the .htaccess file was the cause of the error message.
Regardless of whether you were able to fix the 403 forbidden error or not, I now recommend that you create a issue new .htaccess. You can either create a new .htaccess via your WordPress dashboard or upload a clean .htaccess file. We'll show you both options step by step:
Create .htaccess via WordPress Dashboard
4a. Log in to your WordPress Dashboard as admin
5a. Navigate under "Settings" → "Permalinks"
6a. Save without adjusting the permalink structure via the button "Save changes". You change your permalink structure so not!

✅ Your new clean .htaccess file has been generated and is automatically available in your root directory
Reissue .htaccess yourself
4b. Open on your PC a Text editor program. For example, you can use the "Editor" installed by default on Windows - simply search for it using the native search on your PC or laptop.
5b. Add to the file following text and save them:
# BEGIN WordPress

RewriteEngine On
RewriteBase /
RewriteRule ^index\.php$ - [L]
RewriteCond %{REQUEST_FILENAME} !-f
RewriteCond %{REQUEST_FILENAME} !-d
RewriteRule . /index.php [L]

# END WordPress
6b. Save the file under the name .htaccess from
7b. Load the file in your Root directory (usually httpdocs) high
Note 💡: If you have individual configurations in your .htaccess file, these will be added again by the plugins
✅ Your new .htaccess file is available again
Adjust file permissions
Your website accesses many different files and folders. These files and folders are regulated by access permissions. There are these three different permissions:
- Read: The file may be opened and read or the contents of a folder may be checked.
- Write (Write): The file can be customized, for example, by changing the text of your .htaccess. The contents of a folder can be deleted or new files can be added.
- Execute (Execute): Refers to the execution of files as well as scripts, functions and commands.
These rights can be assigned to owners, groups and others.
The different authorization levels are indicated by a three-digit number combination. Alternatively, you can also choose between the terms "Read", "Write" and "Execute".
If there is an error in the file permissions, for example because you have applied too strict security measures, this can lead to a 403 Forbidden error. WordPress itself provides an overview of the recommended file permissions on this website before. In a nutshell, WordPress itself recommends the following:
- Files: 644 or 640
- Directories: 755 or 750
Note that the wp-config.php should have an authorization of 440 or 400.
I recommend that you check the most important files and directories on your website for their permissions. This includes
- wp-config.php
- .htaccess
- wp-content (here it may still make sense to check the individual directories in the wp-content directory)
The permissions for the individual files / directories can be as follows:
Note 💡: Authorizations vary from website to website. These are only recommendations!
- wp-config.php: 440 (r- r- -)
- .htaccess: 644 (rw- r- r-)
- wp-content: 755 (rwx r-x r-x)
All directories in wp-content should have 655 (rwx - r-x r-x)
In the screenshot below, you can see the permissions in the root directory of a clean WordPress instance. You can also use this as a guide.

Tip 💡: You can find out more about the website Chmod Calculator the authorizations can also be displayed in different formats.
Have you noticed that there is an error in your authorization structure? You can edit this in your WPspace hosting interface as follows:
1. Log in to your hosting interface a
2. select in the menu "Files" from
3. navigate in the file manager of your website to the root directory, which is usually httpdocs means
4. click on the assigned permissions of the file / directoryfor which you want to adjust the authorizations

5. adjust the authorizations as desired in the new window

6. confirm with the button "Save"
✅ Website accessible? If you can now access the pages affected by the 403 Forbidden error again, the authorization structure was the cause of the error message.
Deactivate plugins
Plugins supplement the functions of WordPress for you. Since not every plugin is compatible with every WordPress core version, other plugin and / or PHP version, these can also be the cause of the 403 Forbidden error.
To test whether one of your plugins is the cause, I recommend you proceed as follows:
Tip 💡: You can also follow the steps below on a Staging website test - this will save you a possible downtime of your website.
1. create a Backup your WordPress website
2. now deactivate plugin after plugin and start with the critical plugins. After each plugin, check whether you can access the website / subpage again.
3. as soon as you have found the plugin that has found the 403 forbidden error, reactivate the other plugins.
✅ Website accessible? Then you know that there is a problem with the plugin. Contact the plugin manufacturer's support team or check forums and changelogs for anomalies.

Deactivate CDN
The CDN will not be the cause if you get a complete white screen of death. However, if you can no longer access the assets you are using, such as graphics, video, Javascript or CSS, the CDN may be the cause.
Probably the most frequently used CDN is Cloudflare. Alternatively, some hosters also offer their own integrated CDN.
You can temporarily deactivate the CDN for testing purposes. If your assets are then displayed as desired, the CDN is the reason for your 403 Forbidden error.
Note💡: If you use Cloudflare as a CDN, please note that your DNS management usually runs via Cloudflare. This means that if you deactivate Cloudflare, your website and emails will no longer be accessible! Make sure in advance that you temporarily manage the DNS administration externally.
Check hotlink protection
Hotlink protection prevents other websites from directly accessing the images or files on your website and displaying them on their own pages without hosting them themselves.
Imagine this using a concrete example: You have a cooking blog and publish great pictures of your recipes there. Someone else wants to use this photo on their website without downloading and uploading it again. The person embeds your recipe photo directly via your link. Now a third person comes along and downloads the image. This happens via the performance of your hosting.
With hotlink protection, the second person cannot publish your photo via the link on their website. This ensures that your hosting resources are not used by external websites.
If you are using images or graphics for which the 403 error is not justified, check the settings of your hotlink protection. These
Disconnect VPN connection
Depending on the settings of your website's firewall, it may restrict visitors' access via VPN. As a result, the visitor receives a 403 Forbidden error message.
To make sure that the cause is the VPN connection you are using, you can access the website without a VPN. Alternatively, you can also use a different VPN server if possible.
Contact WordPress hoster
If you are at the end of your troubleshooting (and Latin), contact the support of your WordPress hoster with a request for assistance.
Does your host specialize in WordPress - i.e. is it a Managed WordPress hosting provider, he is directly aware of the 403 Forbidden error and can specifically check and rule out various causes. If the hoster's support responds quickly, this is probably the fastest solution to make your website accessible again.
At WPspace, we usually respond within a few minutes - so we're there for you at lightning speed if you have any questions 🚀
Tip 💡: Let your hoster's support team know directly what testing measures you have already carried out. This will enable support to help you more quickly and get your website up and running again.
Import backup
Are you still receiving a 403 Forbidden error even though you have tested all measures? Then you can import a backup that you created before the error occurred.
Please note that all changes you have made since the backup will be lost when you import a backup. Specifically, this means your changes, comments or orders in your WooCommerce store.
So before you import the backup, save all your changes and I also recommend that you create another backup of the current website.
Conclusion on the 403 Forbidden error
In most cases, the 403 Forbidden error is caused by an authorization problem. This means that certain files or directories may not and cannot be accessed. Therefore, the 403 Forbidden error is displayed instead of the desired file.
The most common causes are an error in the .htaccess file or the authorization structure in the root directory of your WordPress website. You can fix both without much IT knowledge.
If you are unable to find the cause yourself, you can contact your WordPress host's support team. As a last resort, you can import a backup of your website to restore it to the state it was in before the error.


3 Responses
Hey, thanks! That has solved my problem.
LG
Super helpful article! The step-by-step instructions make troubleshooting really easy to understand. Especially the tip with the .htaccess file was a game changer for me. Many thanks for the detailed explanation - it saves a lot of time and nerves!
Thank you dear Liserl for the great feedback on the post 🙂